How to Write a Process
Why Write Processes?
Vivarium comes with a number of processes ready for you to use, but combining processes to form compartments will only take you so far. For many models, the existing processes will be insufficient, so you will need to create your own.
Note
Processes are the building blocks of Vivarium models, so creating a process to model a phenomenon you know well lets other modelers build on your expertise. Processes are a great way to share your knowledge with the modeling community!
Let’s Write a Process!
Suppose we want to model how hexokinase helps maintain intracellular glucose concentrations. Hexokinase catalyzes glucose phosphorylation, which we can describe by the following reaction:
In the reaction above and throughout this tutorial, we will use the following abbreviations:
GLC: D-Glucose
ATP: Adenosine triphosphate
G6P: α-D-Glucose-6-phosphate
ADP: Adenosine diphosphate
v: Rate of the forward reaction
HK: Hexokinase
Tip
Once you have worked through the example in this tutorial, try modeling a different reaction that you work with!
Conceptualize the Model
Make Assumptions
A critical component of modeling is deciding what parts to describe mechanistically and what to approximate. For our scenario, we could model this reaction using molecular dynamics, but this would be computationally intensive and would not scale to larger simulations. Instead, we will assume Michaelis-Menten, sequential bisubstrate kinetics:
Let’s also assume that diffusion is much faster than the reaction so that the concentrations of our enzyme and substrates are constant throughout the cell.
Note
If you actually wanted to model a reaction like this, the
vivarium.processes.convenience_kinetics process can be
configured to model any Michaelis-Menten enzyme kinetics.
Translate Model into Updates
Processes in Vivarium work by repeatedly changing the state of the model. A process makes these changes by computing an update based on the model’s current state and a timestep \(t\).
For the current example, each update will include the following:
A decrease in GLC: \(-v t\)
A decrease in ATP: \(-v t\)
An increase in G6P: \(v t\)
An increase in ADP: \(v t\)
Note
In this example and most of the time in Vivarium, we work in terms of concentrations. We also normally use units of mM, but you can use different units so long as you are consistent.
Determine the Ports
We partition the overall model state into stores, which can be shared among processes. Each process declares ports, each of which will receive a store. When creating a process, you need to decide what ports to declare.
When someone else uses your process, they will create a compartment of it and other processes. These processes will interact by sharing stores. While any number of your process’s ports may be linked to the same store, a port cannot be split between stores. This means that you should put in separate ports any variables that a user might want in separate stores.
For example, ATP and ADP are turned over rapidly in the cell, so a user might want to isolate those variables from others that get updated more slowly. We will therefore create two ports:
nucleoside_phosphates: This port will store theATPandADPvariables.cytoplasm: This port will store theGLC,G6P, andHKvariables.
Implement the Model
To implement the model, create a new Python file named
glucose_phosphorylation.py in the vivarium/processes/ directory.
Then we create a new class that inherits from
vivarium.core.process:
from vivarium.core.process import Process

class GlucosePhosphorylation(Process):
    pass
The Constructor
We declare the ports in the constructor as a dictionary that maps from port name to a list of the names of the variables we need to be in that port.
In the constructor we can also configure the process. We accept
configurations as a dictionary called initial_parameters. For
example, we can let the user configure the kinetic parameters
\(k_{cat}\), \(K_{GLC}\), and \(K_{ATP}\). We can also
provide default values for these parameters.
The configurations (with any missing parameters filled in with defaults) and ports are passed to the superclass constructor to instantiate the process.
from vivarium.core.process import Process

class GlucosePhosphorylation(Process):

    defaults = {
        'k_cat': 2e-3,
        'K_ATP': 5e-2,
        'K_GLC': 4e-2,
    }

    def __init__(self, initial_parameters=None):
        ports = {
            'nucleoside_phosphates': ['ATP', 'ADP'],
            'cytoplasm': ['GLC', 'G6P', 'HK'],
            'global': ['mass'],
        }
        parameters = GlucosePhosphorylation.defaults
        parameters.update(initial_parameters)
        super(GlucosePhosphorylation, self).__init__(
            ports, parameters)
The global port is special: it stores information that needs to be
shared across many processes but that is more like “metadata” than
molecule concentrations. For this example, we’ll store the mass of the
cytoplasm port’s contents.
Even though we’re just getting started on our process, let’s try it out!
At the bottom of the glucose_phosphorylation.py file, instantiate
the process and take a look at some of its attributes:
if __name__ == '__main__':
    parameters = {
        'k_cat': 1.5,
    }
    my_process = GlucosePhosphorylation(parameters)
    print(my_process.parameters['k_cat'])
    print(my_process.parameters['K_ATP'])
Then run your code by executing the whole file:
$ python glucose_phosphorylation.py
1.5
0.05
Notice that the k_cat parameter updated to the value we supplied and
that k_ATP took on the default value.
But wait! Where did the parameters attribute come from? We never
created that attribute, but
vivarium.core.process.Process made it from the
parameters argument we passed to its constructor. We’ll take
advantage of this in the next step.
Generating Updates
Now we can write the next_update method, which generates updates for
each port based on a provided model state and timestep.
Warning
The states parameter passed into the update function is
a view of the overall state, so it must not be changed.
def next_update(self, timestep, states):
    # Get concentrations from state
    cytoplasm = states['cytoplasm']
    nucleoside_phosphates = states['nucleoside_phosphates']
    hk = cytoplasm['HK']
    glc = cytoplasm['GLC']
    atp = nucleoside_phosphates['ATP']

    # Get kinetic parameters
    k_cat = self.parameters['k_cat']
    k_atp = self.parameters['K_ATP']
    k_glc = self.parameters['K_GLC']

    # Compute reaction rate with michaelis-menten equation
    rate = k_cat * hk * glc * atp / (
        k_glc * k_atp + k_glc * atp + k_atp * glc + glc * atp)

    # Compute concentration changes from rate and timestep
    delta_glc = -rate * timestep
    delta_atp = -rate * timestep
    delta_g6p = rate * timestep
    delta_adp = rate * timestep

    # Compile changes into an update
    update = {
        'cytoplasm': {
            'GLC': delta_glc,
            'G6P': delta_g6p,
            # We exclude HK because it doesn't change
        },
        'nucleoside_phosphates': {
            'ATP': delta_atp,
            'ADP': delta_adp,
        },
    }

    return update
Now let’s test this update function by seeing how it changes a state we provide. Replace the testing code we added to the bottom of the file with this:
if __name__ == '__main__':
    parameters = {
        'k_cat': 1.5,
    }
    my_process = GlucosePhosphorylation(parameters)
    state = {
        'cytoplasm': {
            'GLC': 1.0,
            'G6P': 0.0,
            'HK': 0.1,
        },
        'nucleoside_phosphates': {
            'ATP': 2.0,
            'ADP': 0.0,
        },
    }
    update = my_process.next_update(3.0, state)
    print(update['cytoplasm']['G6P'])
With these parameters, we can calculate the reaction rate:
Therefore, we expect the change in concentration of G6P to be:
Let’s see if our process models this reaction as we expect:
$ python glucose_phosphorylation.py
0.4221388367729832
Hooray! This is what we expected.
Ports Schema and Derivers
Our process works, but we had to manually the state. We also haven’t
shown yet how to apply the update we generate to the model state.
Luckily for us, these steps will be handled automatically by Vivarium.
We just need to create a ports_schema method that provides a
schema. A schema is a nested dictionary that describes each
variable the process will interact with. Each variable is defined by a
dictionary of schema keys that specify its default value, how it
should be updated, and other properties.
For this example, our updates are expressed as deltas that should be added to the old value of the variable. This is the default, so the schema can leave out the updater specification. Still, we’ll specify one of the updaters for demonstration.
def ports_schema(self):
    return {
        'cytoplasm': {
            'GLC': {
                # accumulate means to add the updates
                '_updater': 'accumulate',
                '_default': 1.0,
                '_properties': {
                    'mw': 1.0 * units.g / units.mol,
                },
                '_emit': True,
            },
            # accumulate is the default, so we don't need to specify
            # updaters for the rest of the variables
            'G6P': {
                '_default': 0.0,
                '_properties': {
                    'mw': 1.0 * units.g / units.mol,
                },
                '_emit': True,
            },
            'HK': {
                '_default': 0.1,
                '_properties': {
                    'mw': 1.0 * units.g / units.mol,
                },
            },
        },
        'nucleoside_phosphates': {
            'ATP': {
                '_default': 2.0,
                '_emit': True,
            },
            'ADP': {
                '_default': 0.0,
                '_emit': True,
            }
        },
        'global': {
        },
    }
We also can add derivers with the derivers method. Derivers
perform calculations for us that would be tedious to re-compute in many
processes. For example, calculating the mass of the cell’s enzyme and
sugar contents, as we see in this example:
def derivers(self):
    return {
        'my_deriver': {
            'deriver': 'mass',
            'port_mapping': {
                'global': 'global',
            },
            'config': {},
        },
    }
Now, we can run a simulation using Vivarium’s
vivarium.core.composition.simulate_process() function
like this:
from vivarium.core.composition import (
    simulate_process,
    plot_simulation_output,
)

...

if __name__ == '__main__':
    parameters = {
        'k_cat': 1.5,
    }
    my_process = GlucosePhosphorylation(parameters)

    settings = {
        'total_time': 10,
    }
    timeseries = simulate_process(my_process, settings)
    plot_simulation_output(timeseries, {}, './')
We use
vivarium.core.composition.plot_simulation_output to
plot the output from our simulation. In simulation.png you should
see an output plot like this:
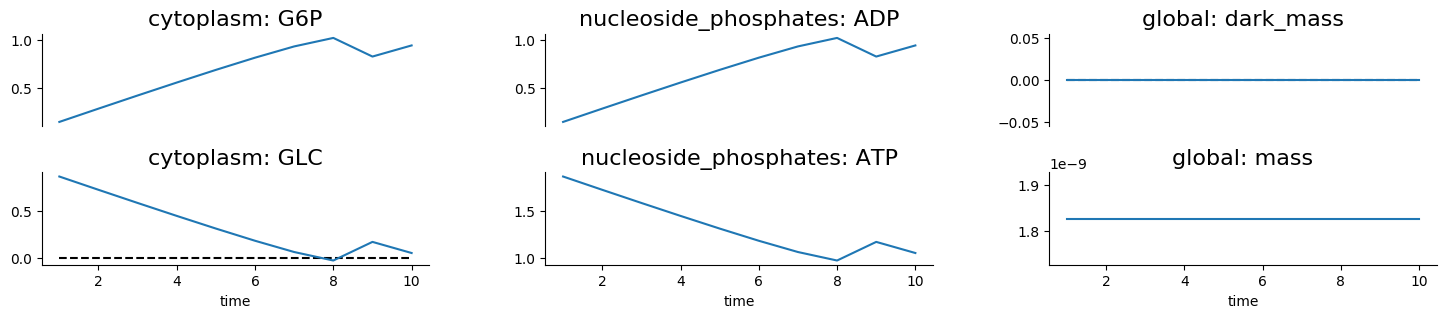
Tip
If a process is erroneously reporting negative values, try decreasing the timestep.
Oops, it looks like the cytoplasmic GLC concentration dropped below zero
around time 8! This happens when the timestep is too long and so our
approximation doesn’t adjust fast enough to dropping concentrations. To
fix this, let’s change the timestep to 0.1.
Note
You may be wondering, “What units is the timestep in?” The answer is that it doesn’t matter! We just need the parameters and timestep to use the same unit of time.
Here’s the settings dictionary with the updated timestep:
settings = {
    'total_time': 10,
    'timestep': 0.1,
}
Now if we run the file again, we should get a simulation.png like
this:

You can download the completed process file here.
Great job; you’ve written a new process! Now consider writing one to model a mechanism you are familiar with.